Build an AI Meeting Prep Assistant in 10 Minutes

Meeting Prep Assistant Setup
This blog walks you through setting up the Meeting Prep Assistant.
This will take 10 minutes total. It looks like there's a lot of instructions, but that's because we have included precisely where you need to click!
With the Meeting Prep Assistant, you'll…:
- Have AI read your calendar
- Have AI research all attendees
- Get a digest of every meeting you have this week
Broadly, there are three things you need to do in order to set this up:
- Create the export of your Google Calendar to a Google Sheet using Google App Scripts
- Create the elvex Data Source that connects to this Google Sheet.
- (Note: you could do this outside of elvex with just ChatGPT or Claude, but you'd potentially be leaking company data and they do not stay synced to Google Sheets—elvex keeps your data fresh, so you don't have to re-download it).
- Create the elvex Asssistant and connect it to your new Data Source.
Ok, let's get started!
Part 1: Exporting Your Google Calendar to a Google Sheet
Step 1: Open Google Sheets
- Navigate to Google Sheets: Go to sheets.google.com.
- Create a New Spreadsheet:
- Click on the "+ Blank" option to create a new spreadsheet.
Step 2: Set Up Your Spreadsheet
- Rename the Spreadsheet:
- Click on "Untitled spreadsheet" at the top-left corner.
- Enter a name like "Calendar Export" and press Enter.
- Rename the Default Sheet:
- At the bottom, you'll see a tab named "Sheet1".
- Double-click on "Sheet1" and rename it to "Calendar Export".
Step 3: Open the Script Editor
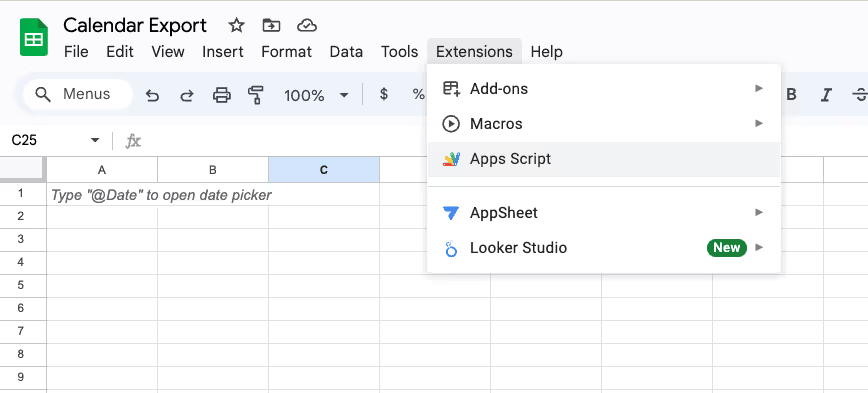
- Access Apps Script:
- From within your new Google Sheet (this is important), In the menu bar, click on "Extensions".
- Select "Apps Script" from the dropdown.
- The Script Editor Opens:
- A new tab will open with the Apps Script editor.
Step 4: Delete Default Code
- Remove Existing Code:
- You'll see some default code like
function myFunction() {}. - Click anywhere inside the code editor.
- Press Ctrl + A (Windows) or Cmd + A (Mac) to select all the code.
- Press Delete to remove it.
- You'll see some default code like
Step 5: Paste Your Script
- Paste into the Editor:
- Click inside the code editor in Apps Script.
- Paste this script using Ctrl + V (Windows) or Cmd + V (Mac).
function exportCalendarToSheet() {

  var ss = SpreadsheetApp.getActiveSpreadsheet();

  var sheet = ss.getSheetByName("Calendar Export");

  if (sheet.getLastRow() === 0) {

    var headers = [["Event ID", "Event Title", "Start Time", "End Time", "Attendees", "Attendee Emails"]];

    sheet.getRange("A1:F1").setValues(headers);

  }


  var calendarId = "example@example.com";  // Replace with your actual calendar ID

  Logger.log("Attempting to access calendar with ID: " + calendarId);

  var calendar;

  try {

    calendar = CalendarApp.getCalendarById(calendarId);

    if (!calendar) {

      throw new Error("Calendar not found with ID: " + calendarId);

    }

  } catch (error) {

    Logger.log("Error accessing calendar: " + error.toString());

    return;

  }


  // Always start from today

  var startDate = new Date();

  startDate.setHours(0, 0, 0, 0);  // Set to beginning of the day


  // End date is 30 days from start date

  var endDate = new Date(startDate.getTime() + (30 * 24 * 60 * 60 * 1000));


  Logger.log("Start date: " + startDate);

  Logger.log("End date: " + endDate);

  Logger.log("Fetching events from " + startDate + " to " + endDate);

  var events;

  try {

    events = calendar.getEvents(startDate, endDate);

    Logger.log("Successfully fetched " + events.length + " events");

  } catch (error) {

    Logger.log("Error fetching events: " + error.toString());

    return;

  }

  var existingEventIds = [];

  if (sheet.getLastRow() > 1) {

    var eventIdRange = sheet.getRange(2, 1, sheet.getLastRow()-1, 1);

    existingEventIds = eventIdRange.getValues().flat();

  }


  var newEventData = [];

  var skippedAllDayEvents = 0;

  var skippedNoAttendeeEvents = 0;

  for (var i = 0; i < events.length; i++) {

    var event = events[i];


    // Skip all-day events

    if (event.isAllDayEvent()) {

      skippedAllDayEvents++;

      continue;

    }


    // Skip events with no attendees

    if (event.getGuestList().length === 0) {

      skippedNoAttendeeEvents++;

      continue;

    }


    if (existingEventIds.indexOf(event.getId()) > -1) {

      continue;

    }

    var title = event.getTitle();

    var startTime = event.getStartTime();

    var endTime = event.getEndTime();

    var organizer = event.getCreators()[0];  // Get the organizer's email

    var attendees = event.getGuestList().map(function(guest) {

      return guest.getName();

    }).join(', ');


    var emails = event.getGuestList().map(function(guest) {

      return guest.getEmail();

    });


    // Add organizer's email to the list if it's not already there

    if (emails.indexOf(organizer) === -1) {

      emails.push(organizer);

    }


    emails = emails.join(', ');


    newEventData.push([event.getId(), title, startTime, endTime, attendees, emails]);

  }

  if (newEventData.length > 0) {

    sheet.getRange(sheet.getLastRow()+1, 1, newEventData.length, newEventData[0].length).setValues(newEventData);

    Logger.log("Added " + newEventData.length + " new events to the sheet.");

  } else {

    Logger.log("No new events to add to the sheet.");

  }


  Logger.log("Skipped " + skippedAllDayEvents + " all-day events.");

  Logger.log("Skipped " + skippedNoAttendeeEvents + " events with no attendees.");

  Logger.log("Script completed. Events fetched from " + startDate + " to " + endDate);

}
Step 6: Update the Calendar ID
- Find the Calendar ID Line:
- In the script you just pasted, locate the line:
var calendarId = "example@example.com"; // Replace with your actual calendar ID.
- In the script you just pasted, locate the line:
Step 7: Save the Script
- Name Your Project:
- Click on the Untitled project name at the top-left.
- Enter a name like "Calendar Export Script" and click Rename.
- Save Changes:
- Click on the Save icon (floppy disk) or press Ctrl + S (Windows) or Cmd + S (Mac).
Step 8: Run the Script
- Select the Function to Run:
- In the toolbar, you'll see a dropdown menu (it might say "myFunction" by default).
- Click on it and select "exportCalendarToSheet".
- Run the Script:
- Click on the Run button (a triangle "Play" icon).
Step 9: Authorize the Script
- Authorization Prompt:
- A dialog will appear stating that the script requires authorization.
- Click "Review Permissions".
- Choose Your Google Account:
- Select the account you used for the spreadsheet.
- Select the account you used for the spreadsheet.
- Handle the "App Isn't Verified" Warning:
- You might see a warning that says "This app isn't verified".
- Click on "Advanced".
- Click "Go to Calendar Export Script (unsafe)".
- Grant Permissions:
- You'll be asked to allow the script to access your Google Calendar and Sheets.
- Scroll down and click "Allow".
Step 10: Wait for the Script to Execute
- Execution Progress:
- The script will start running.
- You can monitor the execution at the bottom of the script editor.
- Check for Logs:
- Click on "Execution log" at the bottom to see the progress and any messages.
Step 11: Check Your Spreadsheet
- Return to Your Google Sheet:
- Go back to the tab with your spreadsheet.
- Go back to the tab with your spreadsheet.
- View the "Calendar Export" Sheet:
- The sheet should now contain data exported from your calendar.
- You'll see headers like "Event ID", "Event Title", "Start Time", etc.
- Below the headers, your calendar events will be listed.
Part 2: Set up a new elvex Data Source to this new Spreadsheet
Step 1 - Open up elvex and navigate to "Datasources"
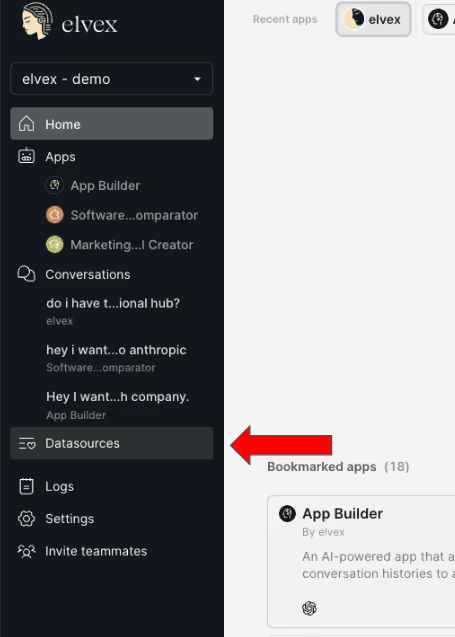
Step 2 - Click "Create new datasource"
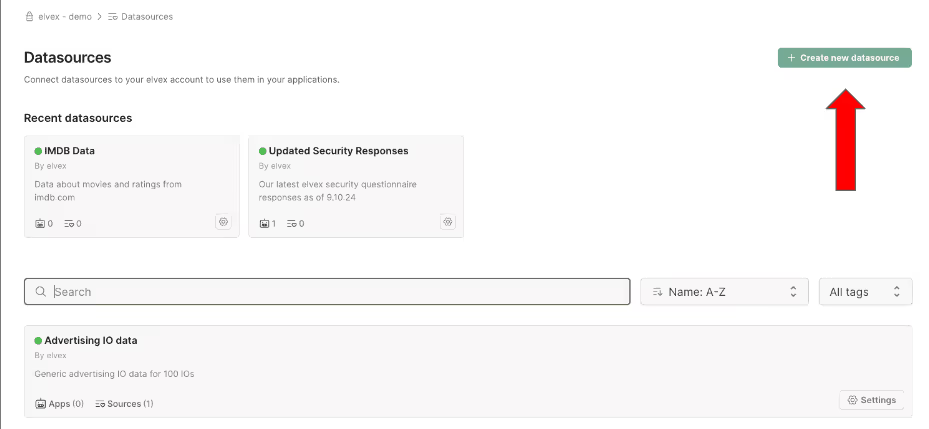
Step 3 - Give your Datasource a name, a description, and then click "Add Files"
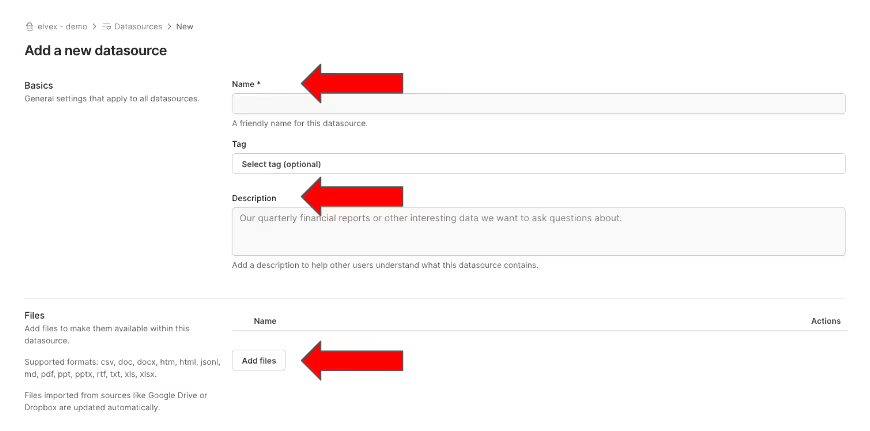
Step 4 - Find the file in your Google Drive, and Select it
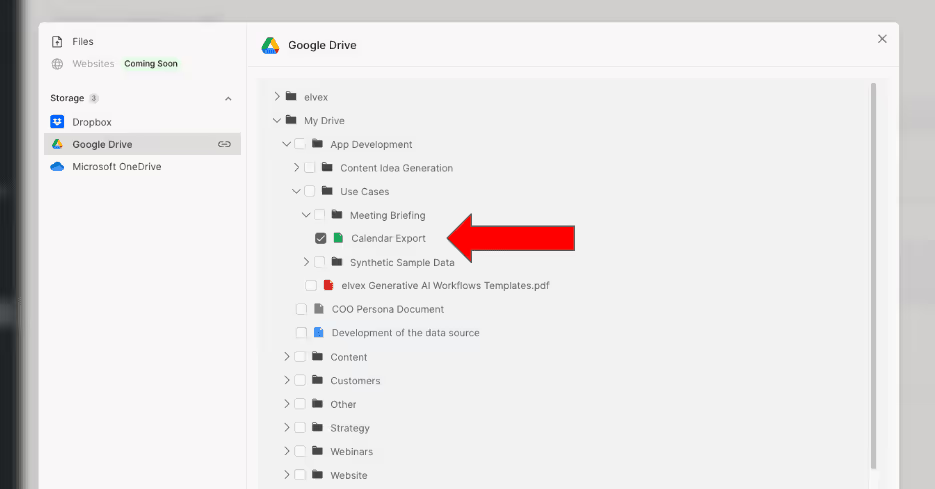
Step 5 - Save and publish your Datasource
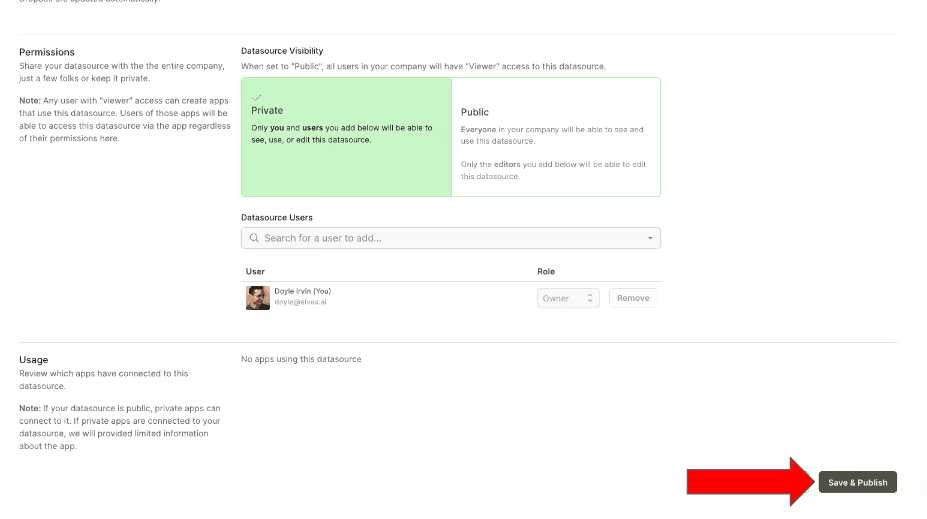
Part 3: Set up a new elvex Assistant with these rules
Step 1 - Navigate to "Apps" and then click "Create new app"
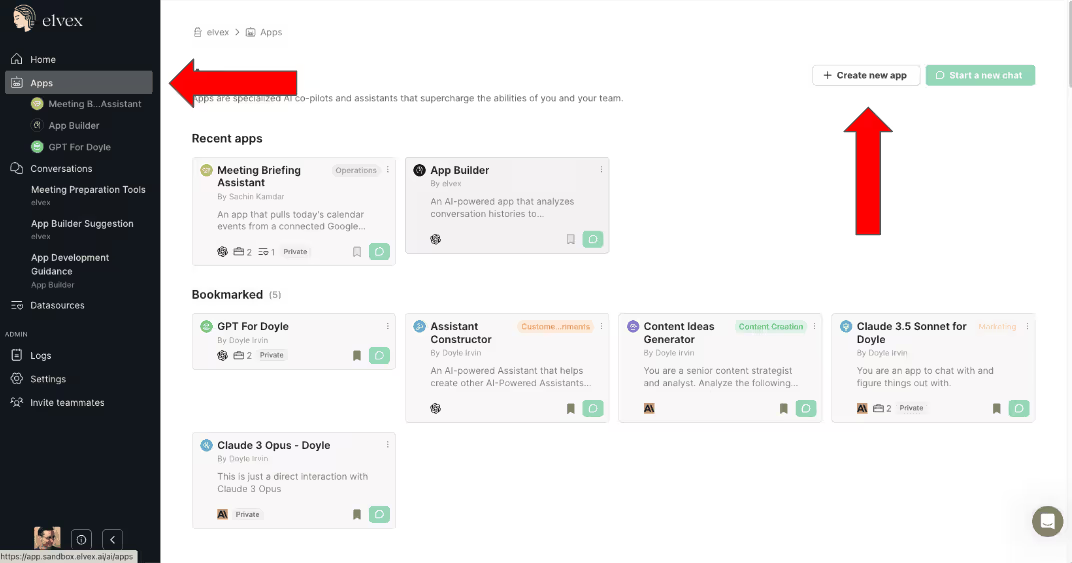
Step 2 - Copy/paste the name, description, and rules below
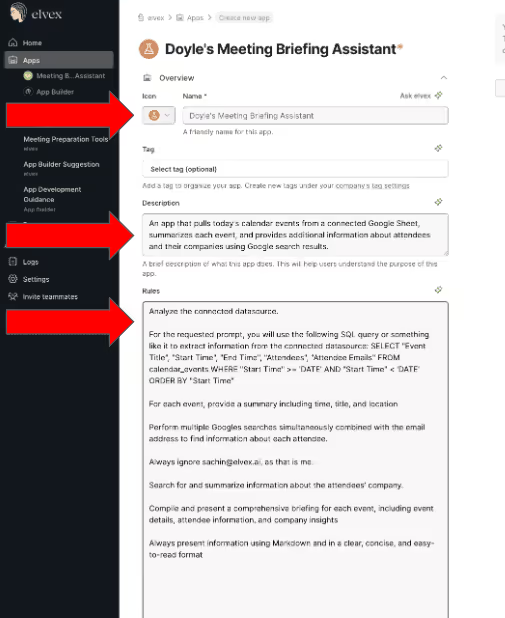
Assistant Name
Meeting Briefing Assistant
Assistant Description
An app that pulls today's calendar events from a connected Google Sheet, summarizes each event, and provides additional information about attendees and their companies using Google search results.
Assistant Rules
Analyze the connected datasource.
For the requested prompt, you will use the following SQL query or something like it to extract information from the connected datasource: SELECT "Event Title", "Start Time", "End Time", "Attendees", "Attendee Emails" FROM calendar_events WHERE "Start Time" >= 'DATE' AND "Start Time" < 'DATE' ORDER BY "Start Time"
For each event, provide a summary including time, title, and location
Perform multiple Googles searches simultaneously combined with the email address to find information about each attendee.
Always ignore sachin@elvex.ai, as that is me.
Search for and summarize information about the attendees' company.
Compile and present a comprehensive briefing for each event, including event details, attendee information, and company insights
Always present information using Markdown and in a clear, concise, and easy-to-read format
Step 3 - Copy paste this context
Click on "Context & Datasources"
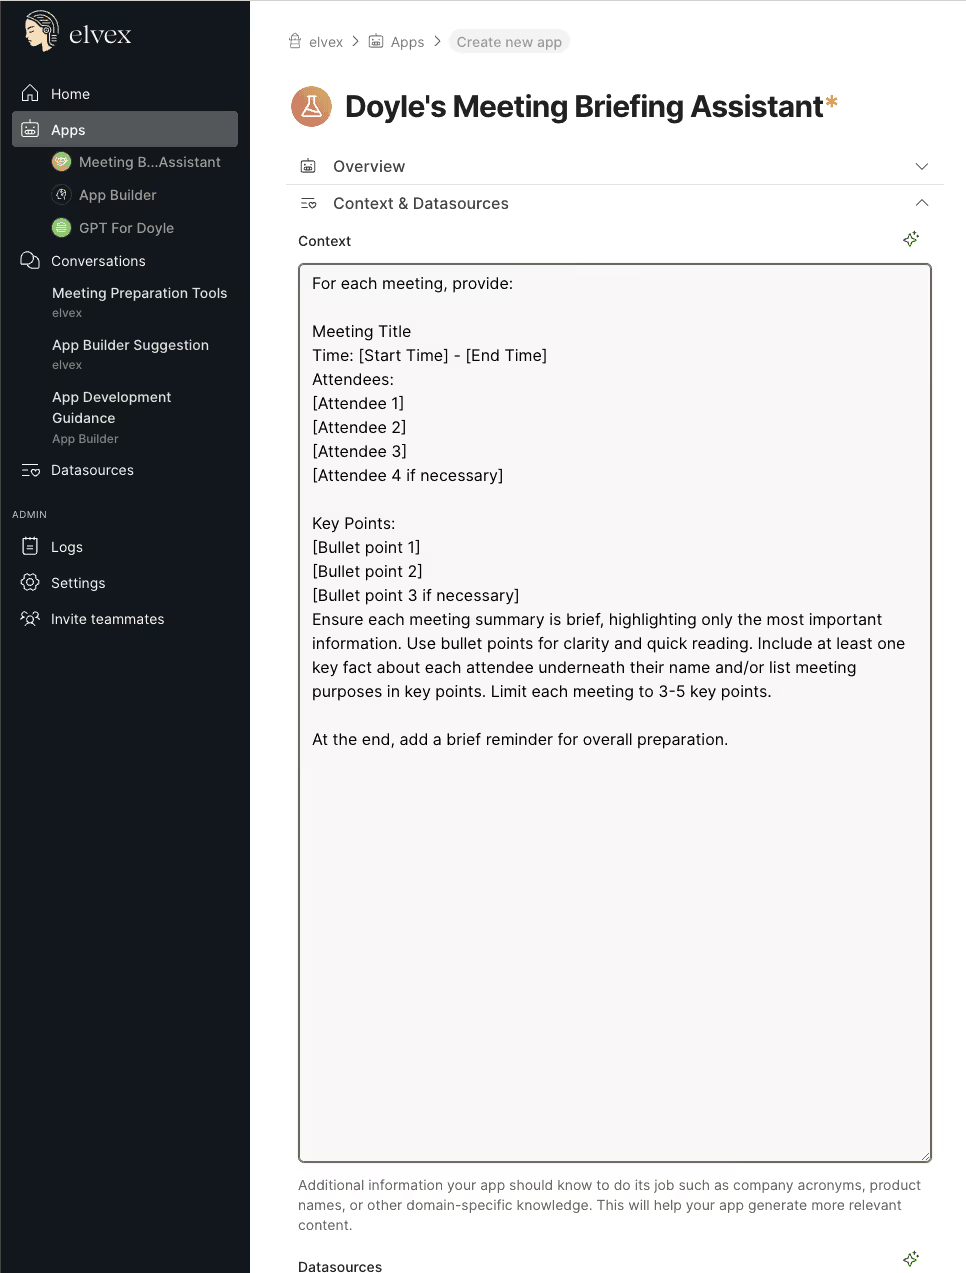
Assistant Context
For each meeting, provide:
Meeting Title
Time: [Start Time] - [End Time]
Attendees:
[Attendee 1]
[Attendee 2]
[Attendee 3]
[Attendee 4 if necessary]
Key Points:
[Bullet point 1]
[Bullet point 2]
[Bullet point 3 if necessary]
Ensure each meeting summary is brief, highlighting only the most important information. Use bullet points for clarity and quick reading. Include at least one key fact about each attendee underneath their name and/or list meeting purposes in key points. Limit each meeting to 3-5 key points.
At the end, add a brief reminder for overall preparation.
Step 4 - Connect Your Data Source
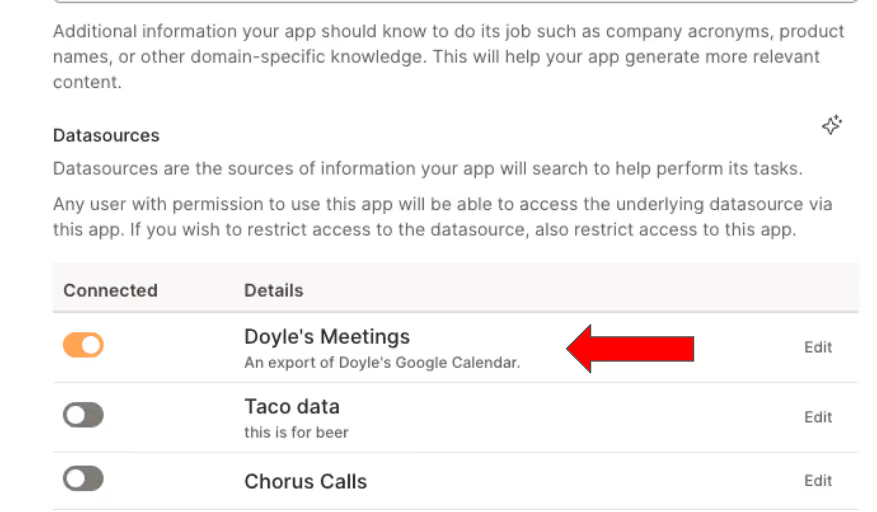
Step 5 - Enable Tools
You want to click the checkboxes next to Web Browsing and Data Analysis
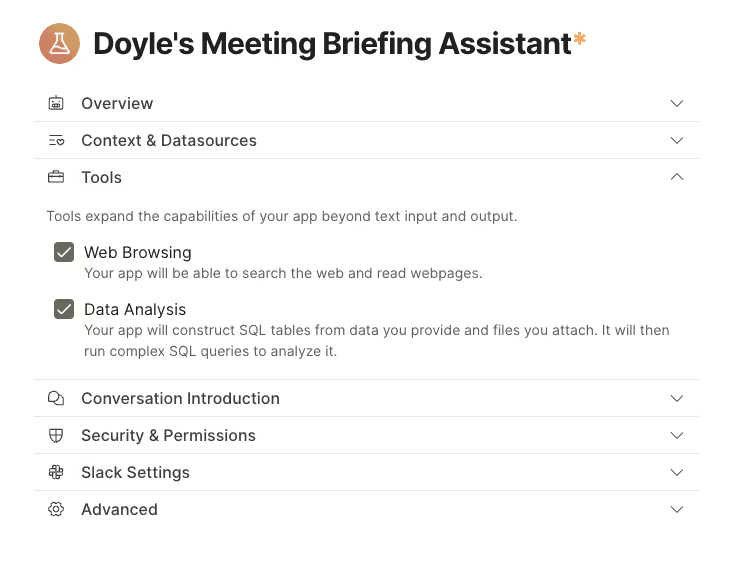
Step 6 - Add Conversation Introductions
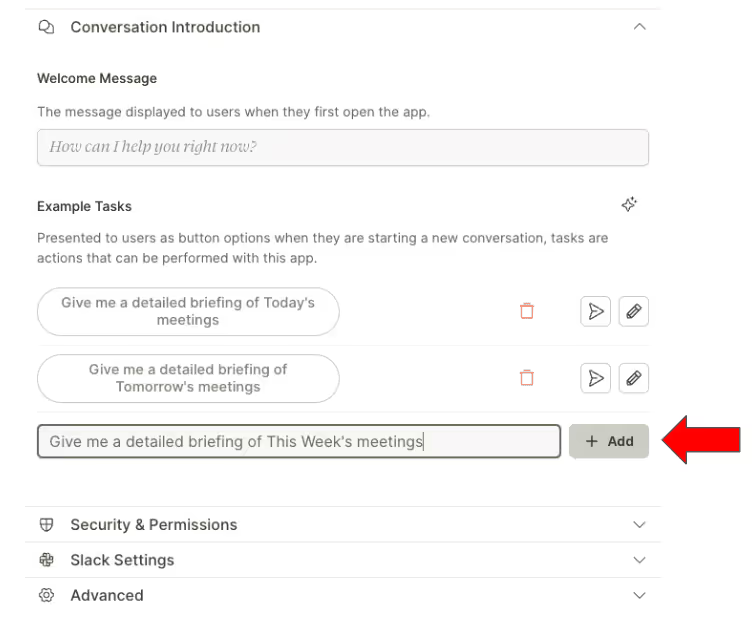
Add these three Conversation Introductions:
- Give me a detailed briefing of Today's meetings
- Give me a detailed briefing of Tomorrow's meetings
- Give me a detailed briefing of This Week's meetings
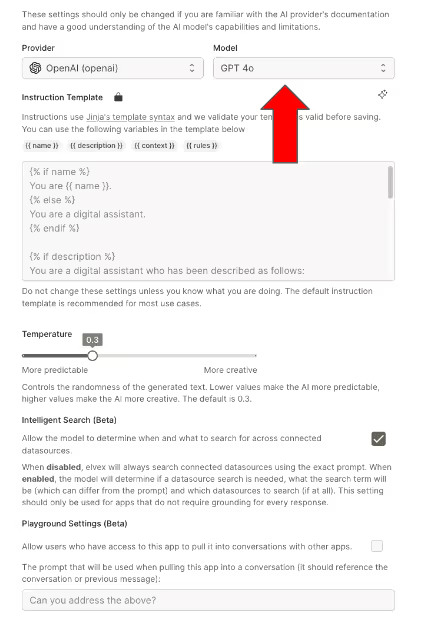
Step 7 - Choose an OpenAI model
If you have access to both OpenAI and other models (like Claude), use OpenAI GPT 4o for this assistant. The reason here is that OpenAI allows you to perform multiple searches with one click, whereas others do not.
Step 8 - Save, publish, and use it!
Your assistant is now ready. Enjoy being more prepared for all your meetings!
Explore AI with elvex
We hope you enjoyed this workflow. elvex is the enterprise platform that accelerates AI adoption, and we love sharing workflows used by us and by our customers, like this one.
If you have any other ideas, and want help bringing them to life, book some time with us here.

.png)
